Coin Photography Kit - Taking Photos the Chards Way

Author: Christian Roberts - Photographer / Content Editor
Published: 27 Jul 2022
Last Updated: 13 Jun 2023
Synopsis
How to take better coin images using Axial Illumination Lighting. We often get compliments and asked for information about our coin photography. Detailed below are the methods we use.
Camera
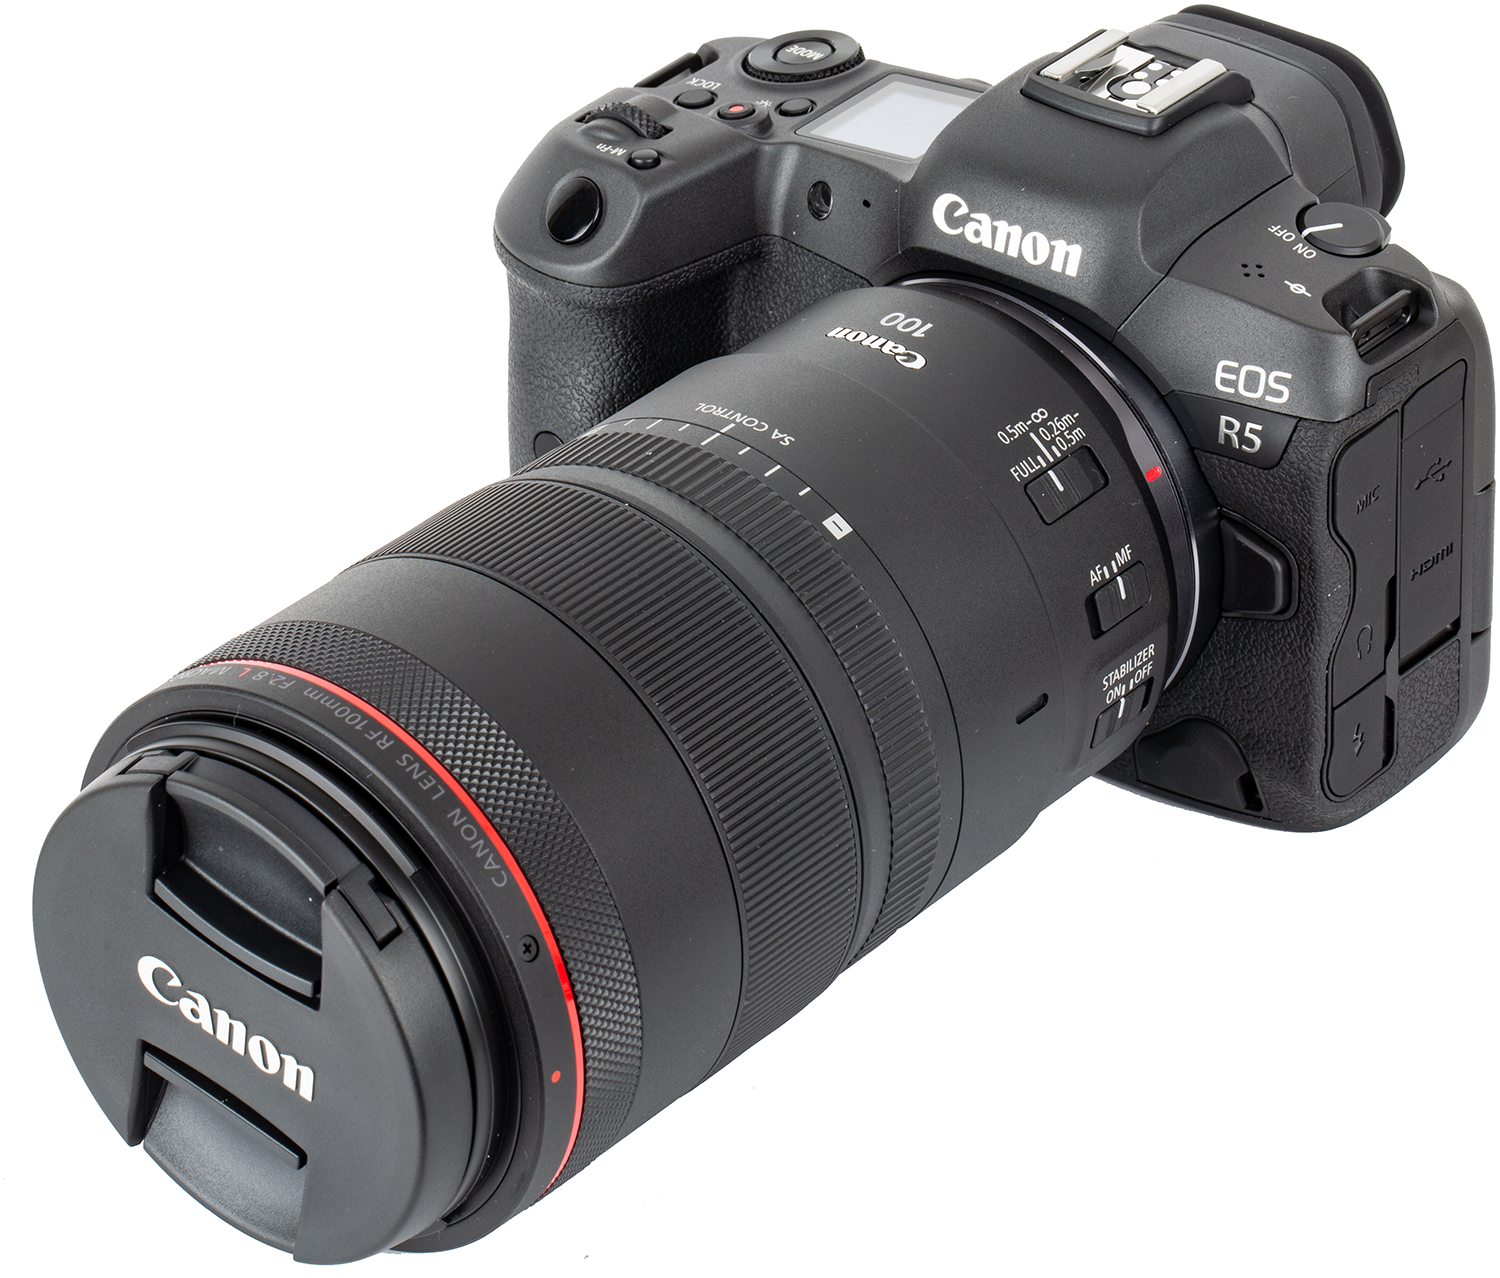
We use a DSLR (Digital Single Lens Reflex) camera. Specifically, The Canon R5.
The Canon R5 is a full-frame mirrorless camera that was introduced in 2020, and it has quickly become a popular choice among photographers and videographers. It boasts impressive specifications and features, making it a versatile and powerful tool for capturing stunning images and videos. The R5 is also designed to be user-friendly, with a range of customization options and a intuitive control layout. The camera's touch screen display is responsive and easy to navigate, and users can easily adjust settings and control the camera with the touch of a finger. The camera also includes WiFi and Bluetooth connectivity, making it easy to transfer images and control the camera remotely.
One of the key selling points of the R5 is its 45 megapixel sensor, which provides exceptional detail and dynamic range. This allows photographers to capture images with excellent clarity and resolution, making it ideal for landscape, portrait, and still life photography. The R5 also supports 8K video recording, which is a huge leap forward in terms of video quality and flexibility.
We also have a back up Canon EOS 5D MKIII. It's a full frame camera which means it uses a sensor that's the same size as a single frame of traditional 35mm film, measuring 36 x 24mm. It gives greater flexibility on Depth of Field compared to what a crop sensor camera would give and more detail. The EOS 5D MKIII is fairly old now but still performs very well and is perfect for the images we need. It's easy to attach to the copy stand securely.
Lighting
We use flash strobes - specifically, a Godox QT600 for the main light and 2 x Godox QS400 for fill lighting. The brand isn't important - any good quality strobe will do as long as they let you adjust the power outlet (must do). The main light needs to have a good range of power so it's useful to have a more powerful one. We also use a Neewer TT500 Speedlight for under product lighting. They are nice and compact and fit nicely under the table we use (more later).
The Godox QT600 is a powerful and versatile flash unit designed for professional photographers and videographers. With its impressive 600 watt-second power output, the QT600 provides ample light for capturing sharp, well-lit images and videos, even in challenging low-light conditions.
One of the key features of the Godox QT400 is its 400 watt-second power output, which provides ample light to illuminate even large or complex scenes. The flash also has an adjustable power range, allowing you to fine-tune the output to match your specific needs.
Modifiers
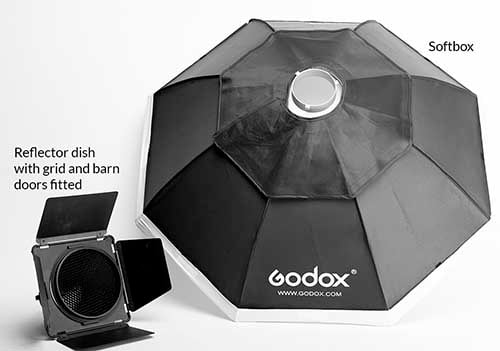
Modifiers direct the light flow coming from the flash unit. A grid forces the light to follow a straighter path whereas a softbox deflects it in a 170-degree arc - softening the light output. We use 3 x softboxes and 1 x reflector dish with grid and barn doors attached. We also use a sheet of white copy paper with some thin white foam taped to it for the speedlight.
Stands
We use a Kaiser Copy stand for overhead images and a range of stands/supports for the strobes including a small low level one for the axial lighting setup (more later). Particularly useful is the wall-mounted boom arm which allows easy movement and saves a lot of space. The Kaiser copy stand is very robust and easily allows height adjustment of the attached camera. Because we take images of a huge variety of sizes of coins, we find a copy stand is best for this, rather than a boom arm to hold the camera, which would slow things down considerably.
Trigger
You’ll need a trigger to sync your camera to your strobe. They come in pairs, and you’ll get a transmitter (goes on camera) and a receiver (goes into strobe). If you use multiple lights there’s no need to get multiple triggers - you would just set the additional ones to “Slave” mode and their sensors would pick up when the main light fires and also produce a flash all at the speed of light.
Baffled?
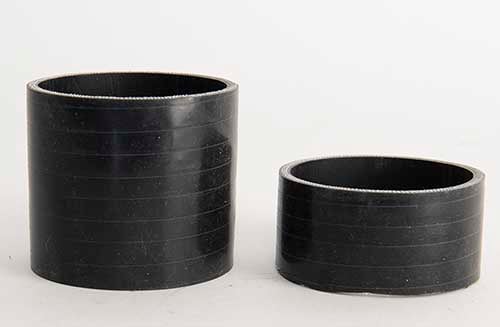
For Axial Illumination Lighting we need to stop some of the light from hitting the side of the coin - the term in photography used for this is a baffle - or a flag. We just use a piece of rubber pipe about 5 inches in diameter (depending on the coin/product we are shooting). A cut down plastic drainpipe would do - or even make one out of cardboard - all we want is to stop light going where we don’t want it to go.
Spirit Level
Very useful to make sure the camera is exactly perpendicular after attaching it to the copy stand. A flat area on our camera is the LED screen on rear.
Lighting Set-Ups
Axial Illuminated Lighting (coming to our website soon)
Axial lighting is a way to illuminate the subject as though the source light was coming from the camera lens. The light source is positioned at the left and points toward the side of the subject. A baffle is used to stop stray light hitting the side of the coin. A piece of 2mm or 3mm glass (just normal glass - nothing special required) is placed above the coin at 45 degrees.
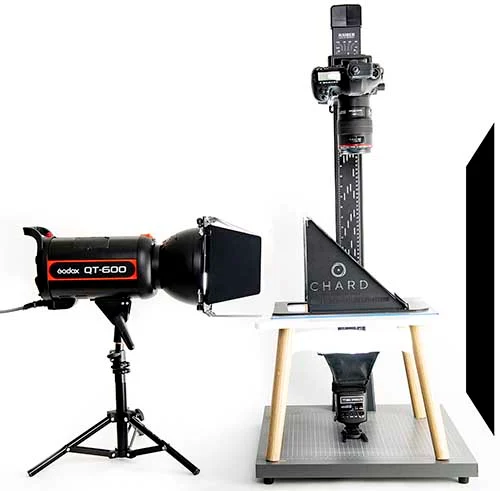
The light hits the glass and some of it will bounce down perfectly illuminating the coin. Some of the light will continue going straight through the glass. It is important to have something dark on the right to absorb the light and stop it bouncing back and up into the lens, which would cause flare. Important here is the 100mm macro & 180 macro lenses we use, which give more room to work with - there is room to place the glass over the subject but under the lens. We couldn't do this with a supermacro lens like the 65mm - there would be no room for the glass.
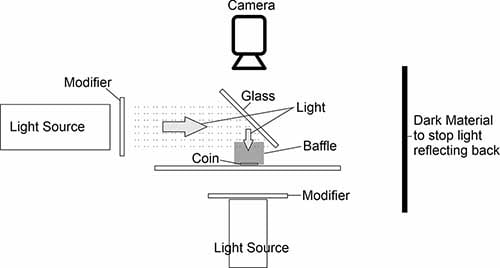

We made our own support stand for the glass. We call it the Axial Lighting Glass Support Stand. It’s laser cut from 4mm MDF and using it allows us a free hand to activate the shutter release and take an image. A sheet of A4 sized glass rests on the stand - there is a lip at the bottom which stops it sliding off. It’s not an essential piece of kit - you can find your own way to make the glass rest at 45 degrees, of course, but it does make things considerably quicker and is easy to use. In use we frequently will increase the angle of the glass by 1, 2 or 3 degrees just by lifting the top edge with a free finger. Using the modelling light on the main strobe (that’s just an additional bulb within the strobe that shows where the main light is going to go) we can look through the viewfinder of the camera and judge where the best light is going to be. It’s a great way to fine tune things and just changing the angle by 1 degree can make a world of difference.

Using Different Modifiers for Axial Lighting.

We use either a grid (fitted with barn doors on a simple reflector dish) or a softbox. They produce very different results. The grid picks up all detail and gives a punchier look. We consider this to be closest to what a coin looks like if you were to hold it (whilst twisting and turning it to admire it). The softbox we use if the coin is highly polished. The grid can’t cope with that and will produce a lot of blowout. It’s a more illustrated look and looks more like what a coin would look like laying flat on a table. Our preferred choice is the grid - but the softbox makes a useful alternative. Because the light is so spread with the softbox lifting the glass will have no impact. Remember to use some black material on the right to stop light bouncing back.

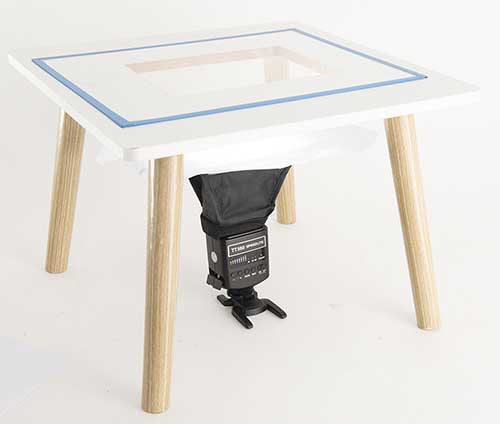
Under Product Lighting
As mentioned above we use a speedlight. We set this to slave mode - this means when the sensor in the speedlight sees a flash from another strobe it will also fire. A simple and very cheap stand we use is a small side table we purchased from Home Bargains and simply cut a rectangular hole in it. We rest a piece of glass on top of the hole and place our coin on that - with the speedlight underneath. Make sure the legs of the table are longer/taller than the height of the speedlight. Be careful not to use full power - with the overhead camera we can’t get much separation of speedlight to coin or the viewfinder would be too tall to look through. So if it’s too bright flare will occur and spoil the image of the coin. We just want to get to a stage where it’s a fairly even brighter colour around the edge of the coin. We can then easily cut out the background in Photoshop. Speedlights produce harsher light and their modifiers don’t help much with that so we add a piece of copy paper with some thin foam sellotaped to it as a further aid to soften the light.
Related Blog Articles


Popular Products


This guide and its content is copyright of Chard (1964) Ltd - © Chard (1964) Ltd 2024. All rights reserved. Any redistribution or reproduction of part or all of the contents in any form is prohibited.
We are not financial advisers and we would always recommend that you consult with one prior to making any investment decision.
You can read more about copyright or our advice disclaimer on these links.